APPLIED LINGUISTICS for BA Students in English
GRAMMATICAL STRUCTURES
The presentation of structures
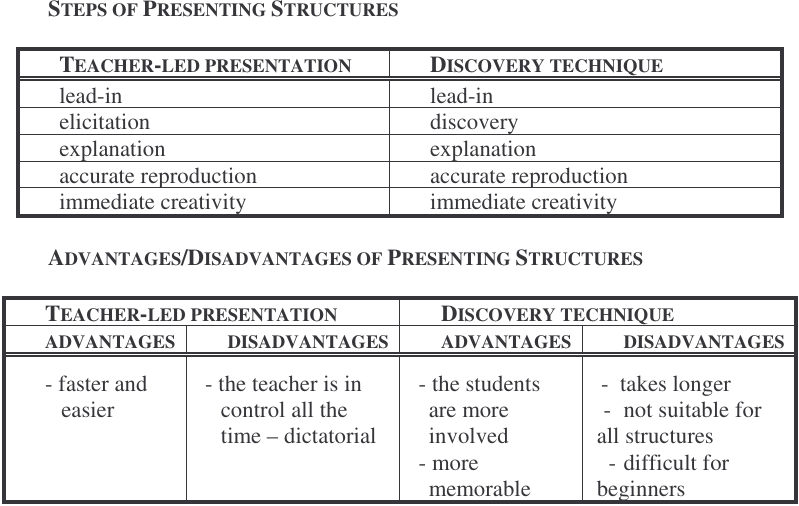
When we present a structure, it is important to show what the structure means and how it is used by giving examples; show clearly how the structure is formed, so that students can use it to make sentences of their own. There are two types of presentation: teacher-led presentation (the overt way or explicit way of presentation) and discovery technique (the covert or implicit way of presentation).
I. The general model for the teacher-led presentation of structures
1. Lead-in phase – The context is introduced and the meaning or use of the new language is demonstrated. Jeremy Harmer (2003) distinguishes three types of context:
a. the students’ world – such as a classroom, their homes, etc.;
b. outside world – such as stories, situations which can be simulated or real;
c. formulated information – e.g. timetables, statistical charts, etc. The meaning of the target structure can be presented
a. visually – the simplest and clearest way to present a structure is often to show it directly, using things the students can see: objects, the classroom, yourself, the students themselves, pictures e.g. by pointing to the ceiling if you want to teach the structure ‘The ceiling is too high to reach.’,
b. through a situation – it is not always possible to show the meaning of a structure visually, using what is in the class. Another way of showing meaning is to think of a situation from outside the class in which the structure could naturally be used. The situation can be real or imaginary. E.g. ‘There is no point in … ing.’ with the situation ‘He lives nearby so there is no point in going there by bus.’
c. by contrasting structures – Sometimes we need not only to present single structures, but to show the difference between two structures; this is especially important when there is a contrast between two structures in English which does not exist in the students’ own language. There are two basic ways of doing this: by giving examples and by giving simple explanations e.g. ‘I have seen that film.’ vs. ‘I saw that film last week.’ (Doff 1990)
At this stage students may become aware of certain language concepts about the new structure (e.g. with simple past the action is finished, it happened in the past, at a certain point of time). If teachers want to make the concept of the past comprehensible for the students, they can bring two photos of the same person or city into the classroom, one of them taken ten years ago, and the other one taken recently. Another way of introducing this concept is by using a calendar with the help of which we can present certain days belonging to the past.
2. Elicitation – The aim of elicitation for the teachers is to learn whether students can produce the new language, if they have already learnt it, if they are familiar with the structure, there is no need for practice but instead of practicing the teachers have to focus on the problems students have with it (e.g. they mix up ‘watch’ with ‘look at’).
3. Explanation – At this stage the teacher shows how the new language is formed (grammar explanation and charts can be provided), draws the students’ attention to the characteristic features of form (e.g. past forms, exceptions, irregular verbs), pronunciation, contracted forms. The teacher may check if students have understood the new language.
4. Accurate reproduction (controlled and semi-controlled practice) – At this phase students are asked to repeat and practice model sentences. The teacher makes sure that the students can form the new language correctly and pronounce it; the focus is on accuracy so the teacher has to correct all the mistakes. Choral and then individual repetition should be used. This stage must be short. There are various types of mechanical drills: substitutional e.g. Peter went … to the shop/to school.
and transformational
e.g. It is sure that Peter went to school.
Peter must have … . (gone to school)
5. Immediate creativity/production stage – The aim of this stage is to see if students have understood the structure in controlled activity so students are expected to write or say their own sentences based on clues (e.g. words, pictures, etc.). If students make too many mistakes, the teacher needs to go back to the previous stages but if they give a good performance, the teacher may go on to the further activity. Meaningful drills are used here.
Rules should be taught deductively which means that the teacher gives the rule and students have to use it. This way of presentation is to be used with adult students as they need detailed explanation by the teacher.
II. The general model for the discovery technique
The basic idea here is to give students a listening or reading text or some examples of English sentences and ask them to discover how the language works. The teacher gets the students to do most of the work. This is the so-called inductive teaching, when the teacher gives examples and students formulate the rule. It is very often used with young learners or students at more advanced levels. Young learners are given nursery rhymes, songs from which they can acquire certain grammatical structures and they can use them without any teacher’s explanation. They acquire grammatical structures as lexical units. On the other hand, this technique can be used with more advanced students as they are able to discover a pattern on the basis of their earlier experience.
1. Lead-in – The function of this stage is to introduce context and raise students’ interest but instead of elicitation students work in pairs or individually and work on a task. After the stage mentioned above the explanation stage follows.
2. Explanation – It means that the teacher discusses with the students what they have found. After this discussion the teacher may go on with making students practice the target structure at two levels:
3. accurate reproduction – see T-led presentation
4. immediate creativity – see T-led presentation